Start with a Forensic Inspection, Not a Sledgehammer
Professionals don’t begin with demolition; they begin with investigation. Before any repair, the goal is to understand how the problem started, how far it has spread, and what collateral damage might already be in play.
Work methodically from the exterior inward. Walk the perimeter of your home and look for signs of distress: cracked or missing caulk around windows, peeling paint near the foundation, stained siding, or soil sloping toward the house instead of away. These are early clues of moisture intrusion, which is the leading cause of hidden structural and cosmetic damage.
Inside, trust your senses. Musty or “earthy” smells, uneven temperature zones, or persistent dust in specific rooms often point to air leaks, hidden mold, or duct issues. Use a strong flashlight and a straightedge (or long level) to inspect baseboards, ceilings, and around window jambs for subtle bulges, hairline cracks, or discoloration. Gently press on suspect areas of drywall, trim, and flooring; spongy or movement-prone surfaces often indicate underlying rot, delamination, or structural weakness.
Whenever possible, inspect from below and above. Access basements, crawl spaces, and attics to view the “back side” of problems you see inside finished rooms. Water stains on subflooring, darkened joists, rusted fasteners, and mineral deposits on concrete (efflorescence) all reveal long-term moisture that may not yet be visible on interior finishes. This forensic approach ensures that your repair plan addresses causes, not just symptoms.
Control Moisture Before You Touch a Tool
No professional will repair drywall, flooring, or framing until they know moisture is managed. Repairing damage without stopping the water, vapor, or condensation problem is one of the most expensive mistakes homeowners make.
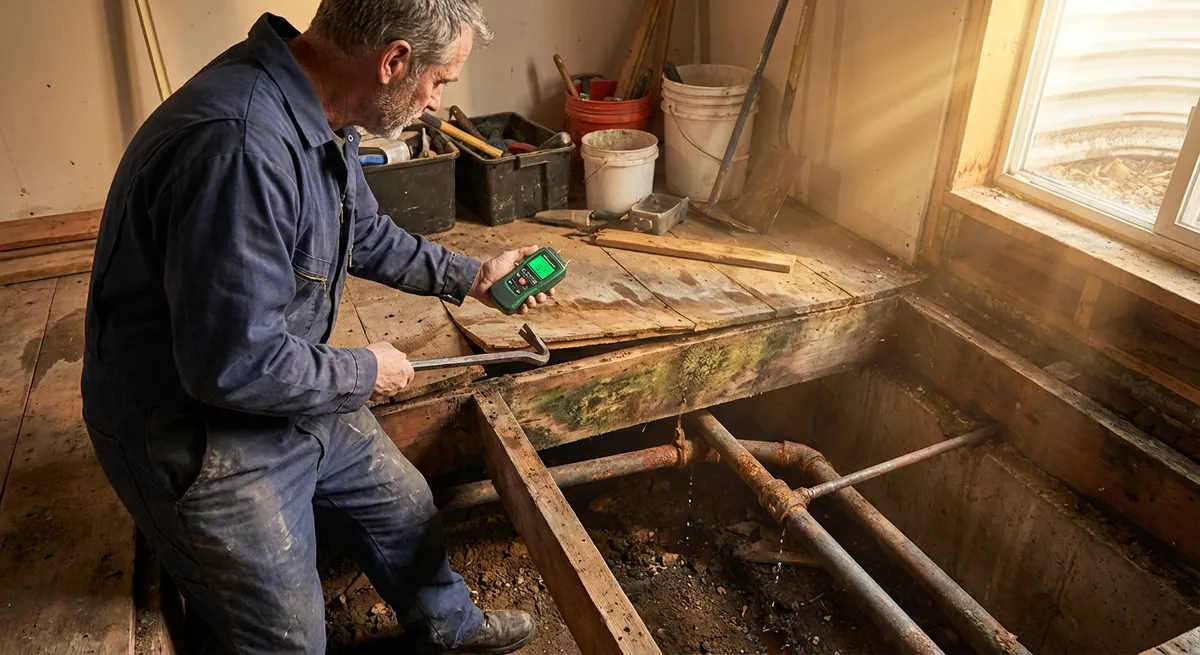
First, identify the moisture pathway. For bulk water (leaks and flooding), look at the roof (shingle condition, flashing, gutters), exterior walls (cracked masonry, failed siding, deteriorated sealant), and plumbing (around tubs, showers, water heaters, and under sinks). For chronic high humidity (often in basements, bathrooms, and kitchens), examine ventilation: are exhaust fans vented outdoors, not into the attic? Is there adequate fresh air and proper use of dehumidifiers in damp climates?
Use a moisture meter where possible. Pros rely on these inexpensive tools to determine moisture content in wood, drywall, and subflooring. Materials may look dry but still contain enough hidden moisture to grow mold or lead to future rot. As a rule of thumb, structural wood should typically be at or below the manufacturer’s recommended levels for your climate (often in the 8–15% range, depending on region), and drywall should not feel cool or damp to the touch.
Once you’ve corrected the source (repaired flashing, fixed the pipe, redirected downspouts, re-graded soil, or installed proper ventilation), allow affected areas to dry thoroughly. In many cases, this means using fans and dehumidifiers for several days before sealing walls back up. Only then is it safe and genuinely “restorative” to proceed with cosmetic and structural repairs that will last.
Choose Repair Methods That Preserve Structure, Not Just Appearance
A hallmark of professional restoration is knowing when to patch, when to reinforce, and when to replace. The goal is always the same: maintain or improve the structural integrity of the home while respecting its original design.
For wood framing and trim, avoid the instinct to replace everything at the first sign of damage. If decay is localized and the surrounding wood is solid, pros often use “scarf joints” or “dutchman” repairs: cutting out only the damaged portion and integrating new wood with the same species and profile. Epoxy consolidants and fillers designed for structural wood repair can restore strength to slightly softened areas, especially in historic homes where original material and detailing are important.
With drywall and plaster, the repair technique depends on the extent and cause of damage. Hairline cracks from minor settling can often be stabilized with joint compound and reinforcing tape, but recurring cracks in the same location may require more robust measures, such as evaluating framing movement or using plaster washers and mesh to re-anchor loose plaster to lath. Large sections affected by water damage or mold should be cut back to solid, clean material rather than skimmed over; pros always chase damage until they find sound substrate.
For floors, be wary of simply overlaying new flooring over soft or uneven substrates. Professional repair involves exposing and correcting the cause—often a failed subfloor panel, undersized joists, or water damage around plumbing fixtures. Sistering joists, adding blocking, or replacing sections of subfloor with properly fastened, exterior-grade panels results in a level, squeak-free floor that can support tile, engineered wood, or other finish materials without premature failure.
Plan Repairs as Systems, Not Isolated Fixes
Experienced contractors think in terms of building systems: structure, envelope, mechanicals, and finishes all interact. The most durable and cost-effective repairs respect these interdependencies. Instead of treating a damaged wall, leaky window, or bouncy floor as a stand-alone issue, zoom out and ask how it fits into the bigger picture.
For example, when repairing wall damage around an old window, this is an opportunity to evaluate and potentially upgrade the entire wall assembly: flashing techniques, insulation levels, air sealing strategies, and even window performance (glazing, low-E coatings, and frame material). A “simple” wall repair might become a targeted building-envelope improvement that enhances comfort, reduces drafts, and lowers energy bills.
Similarly, when you open a ceiling to chase a chronic leak, assess the adjacent framing, insulation, and mechanical runs. Are there undersized or poorly insulated ducts causing condensation? Are there unprotected electrical splices that should be brought up to code? Pros rarely close a cavity back up without correcting obvious weaknesses, even if they weren’t the original reason for the repair.
Sequencing matters as well. Plan your project from the “inside-out” and “bottom-up”: structural and moisture issues first, then mechanical/electrical/plumbing corrections, then insulation and air sealing, then finishes. This systematic approach prevents rework, helps you budget realistically, and ensures that visible upgrades are backed by sound, invisible improvements.
Use Professional-Grade Materials and Documentation to Future-Proof Your Work
High-quality repairs depend not only on technique, but also on material selection and documentation. Professionals choose products compatible with existing conditions and climate, and they leave a clear record of what was done for future owners—or for themselves, years later.
Match materials to both function and environment. Exterior repairs in wet or coastal climates call for corrosion-resistant fasteners, decay-resistant lumber, and flexible, UV-stable sealants. Interior repairs in bathrooms and basements should use moisture-resistant drywall, waterproofing membranes where appropriate, and mold-resistant caulks and paints in high-splash or high-humidity areas. Adhere to manufacturer specifications for installation spacing, fastener type, and curing times; these details determine performance and warranty validity.
Document everything. Take dated photos of damage before, during, and after repairs—especially when structural elements, wiring, or plumbing are exposed. Keep receipts, product labels, and any technical datasheets for materials you’ve used. Note the brands, model numbers, and locations of any hidden components (e.g., shut-off valves, junction boxes, added blocking). Pros often keep a dedicated “house binder” or digital folder for this purpose.
This documentation serves three purposes: it helps inspectors or future contractors understand what’s behind the walls, it supports resale value by demonstrating quality work, and it gives you a reference point if a problem recurs. In effect, you’re not just repairing the home; you’re building a maintenance history that makes every future restoration decision smarter, faster, and less costly.
Conclusion
Professional-level home repair and restoration isn’t about swinging a hammer harder—it’s about thinking like an investigator, respecting building science, and planning each fix as part of a larger system. By starting with a careful inspection, controlling moisture before you touch finishes, choosing structurally sound repair methods, treating issues as interconnected systems, and documenting your work with the same rigor a contractor would, you transform “patch jobs” into durable improvements.
Whether you’re addressing a single damaged wall or planning a phased restoration of an older home, applying these principles will help you avoid repeat problems, preserve structural integrity, and add real long-term value. The difference between a temporary fix and a professional repair is rarely visible on day one—but it becomes unmistakable over time.
Sources
- [U.S. Environmental Protection Agency – Moisture Control Guidance for Building Design, Construction and Maintenance (PDF)](https://www.epa.gov/indoor-air-quality-iaq/moisture-control-guidance-building-design-construction-and-maintenance) - In-depth building science guidance on preventing and managing moisture, a key factor in lasting repairs
- [U.S. Department of Energy – Building Envelope and Air Sealing](https://www.energy.gov/energysaver/weatherize/air-sealing-your-home) - Explains how walls, windows, and air leaks interact, useful for system-based repair planning
- [Old House Journal – Structural Wood Repair with Epoxy](https://www.oldhouseonline.com/repairs-and-how-to/structural-wood-repair-with-epoxy/) - Detailed look at professional techniques for repairing rather than replacing damaged wood
- [The Family Handyman – How to Use a Moisture Meter](https://www.familyhandyman.com/project/how-to-use-a-moisture-meter/) - Practical overview of using moisture meters to diagnose hidden water damage
- [National Park Service – Preservation Briefs (Technical Preservation Services)](https://www.nps.gov/subjects/historicpreservation/preservation-briefs.htm) - Authoritative technical bulletins on repairing and restoring historic building materials and assemblies